Threads are lightweight sub-processes which share the same address space and data, and can execute different tasks concurrently. Compared to processes, context switching between threads is less expensive. In Java environment, a Java thread is an instance of Thread class or its subclasses.
Create and start a thread
To create a thread
Thread thread = new Thread();
To start the thread
thread.start();
start() method is used to start a newly created thread. It performs following tasks:
- A new thread starts
- The thread moves from New state to the Runnable state.
- When the thread gets a chance to execute, the run() method of the target will run.
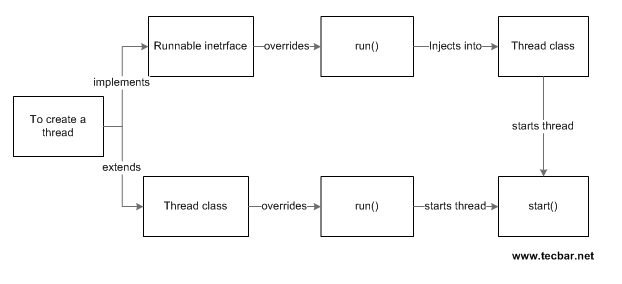
In practice, there are two ways to create a thread and execute some codes. One way is to extend Thread class, and another way is to implement Runnable interface and inject the target a thread. Both ways has a run() method. The run() method is used to perform action for a thread.
Extending Thread Class
The procedure to create a thread by extending Thread class is described below:
- Create a subclass of Thread class
- Overrides the run() method and add the code in run() method which will be executed by the thread.
- Call start() method to move the read to Runnable state
Example:
|
1 2 3 4 5 6 7 8 9 10 11 12 13 14 15 16 17 18 |
package net.tecbar.thread; public class ThreadTest { public static void main(String[] args) { ThreadTypeA thread = new ThreadTypeA(); thread.start(); // start a thread } } class ThreadTypeA extends Thread { public void run() { // add your logic here System.out.println("I am a type A thread"); } } |
You also can create an anonymous subclass of Thread. Here is one example
|
1 2 3 4 5 6 7 8 9 10 11 12 13 14 15 |
package net.tecbar.thread; public class ThreadTest2 { public static void main(String[] args) { Thread thread = new Thread() { public void run() { // add your logic here System.out.println("I am an anonymous thread"); } }; thread.start(); // start a thread } } |
Implementing Runnable Interface
The procedure to create a thread by implementing the Runnable interface is described below:
- Create a class that implements the Runnable interface
- Overrides the run() method and add the code in run() method which will be executed by the thread.
- Create a thread object by injecting a Runable object
- all start() method to move the read to Runnable state
Here is another example:
|
1 2 3 4 5 6 7 8 9 10 11 12 13 14 15 16 17 18 19 |
package net.tecbar.thread; public class ThreadTest3 { public static void main(String[] args) { ThreadTypeB threadB = new ThreadTypeB(); Thread thread = new Thread(threadB); thread.start(); // start a thread } } class ThreadTypeB implements Runnable { public void run() { // add your logic here System.out.println("I am a thread implemented Runnable interface"); } } |
An anonymous implementation example of Runnable interface is
|
1 2 3 4 5 6 7 8 9 10 11 12 13 14 15 16 |
package net.tecbar.thread; public class ThreadTest4 { public static void main(String[] args) { Runnable runnable = new Runnable() { public void run() { // add your logic here System.out.println("I am an anonymous thread implemented Runnable interface"); } }; Thread thread = new Thread(runnable); thread.start(); // start a thread } } |
Implement Runnable or Extend Thread?
Normally, implements Runnable is the preferred way. There are several pros implementing Runnable.
- Runnable is interface, and easier to extend.
- In OOP world, coding to an interface rather than to implementation is still a good practice.
- When accessing the same resources, using Runnable implementation will consume less memory than extending Thread class. Many threads can share the Runnable.
- Decouple the computation from the execution.
When to extend Thread?
If you want to modify the functionality of Thread class, you can extend Thread.


